Monday, January 30, 2012

My Design Style: Part 2

We're on a decorating kick here, I guess, and now Leslie is here today with look into her home.  Her house is so cute!  She has amazing style and her home is always so warm and welcoming.
Here's Leslie:

I love decorating and I'm one of those people who is always rearranging furniture and accessories every few months for a new look.

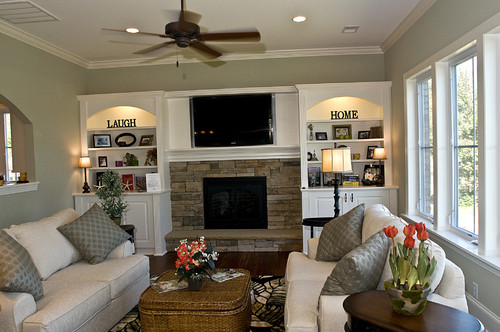
I have always loved blues and whites and since my husband is from Maine and that is our favorite vacation spot, our house has always had a "coastal vibe" (even though we are stuck in the dry, Utah desert).  Lately though, I've added more vintage elements and pops of green, red and yellow and I finally feel like the look I have is comfortable, and really reflects our family.

Kim recently helped me create this picture wall. This wall is such a large white space and I could never figure out what to put there.  I found most of these picture frames at D.I. (thrift store) and then decided what colors I wanted to paint them.  This took a few weeks of rearranging and trying different combinations.  I didn't want too matchy, but also not too busy.  I am really happy with how it turned out.


(I'd love to paint these walls grey, but that is a big project... some day).


I used the 3M Velcro strips on the picture frames for the first time, and they worked great.  I wish I had a picture of me on my husband's shoulders trying to hang these. 


My sister, Kim made this vinyl tree with my husband's and my initials.  She did a great job.  I put the vinyl right on the wall and hung the frame around it.

The sister of my sister-in-law (I'm not making that up) makes some really cute, unique, modern prints, that I love.  You can see them here.  She made the home can be a heaven on earth print in the first picture, and the silhouettes of my boys below.


When we got these family pictures taken in the fall, I didn't want to spend a lot of money hanging them since I knew I would want to change them up after a little while and hang something else there.  I found these flat, glass only frames at Hobby Lobby. They are very inexpensive and just the look I was going for.

When Kim did the design style  post, I took one of the quizzes for fun and this is what it said, "Your style is Folksy Country. You don’t like things to be too matching. You acquire your furniture and accessories over the course of time. You like pattern and solids and can mix them well. You love flea markets and can find a place for just about anything you find or buy. You like animals and probably have a dog or cat or both. You make people feel at home and relaxed. You have lots of knick-knacks. When you entertain you have many friends and family over -- they feel they can pop over at anytime. Your decorating challenge is to simplify and edit your accessories."

Other than the pets (which our kids would love to have, but they haven't quite talked us into it yet), what do you think, Kim?  Does that sound like me?  Viewers, does that look like me?  I don't know.  I have always like bright colors.  Maybe I was on to something when my Mom let Kim and I re-do our bedrooms in Jr. High and pick out any color scheme. (Mine was: primary colors, Mickey Mouse, and M.C. Escher). Weird  : )

Yes, Les, I think that totally sounds like you!  Aren't her boys so cute! I love those family pictures.  And I really need you to make me some cute pillows, she has a great eye for fabrics.   Liking patterns and solids, yes, yes, you should have seen her room - solid bright blue on the bottom, bright red chair rail, and red/yellow/blue sprinkles wallpaper on top, with framed M.C. Escher prints and a Mickey Mouse poster.  It was a little crazy, but cute!

Pin It

Sunday, January 29, 2012

Weight-loss Accountability

Well, it's been a month now since I started working on my goals, especially my weight-loss goal (see here.)  Time to fess up, be accountable, and resolve to do better. 

So how have I done, well, good and not so good.  I'm happy to report that I'm back in the habit of drinking water every day and it's getting easier.  Which also means I'm doing pretty good (I slipped a couple times) at limiting my pop intake to only once a week.  I've found it's really hard to get all my water in when I nurse a pop all afternoon.  Plus if you remember this post here, I have to drink an extra glass of water for every pop I drink.  I'm actually not craving it so much either, and I really savor it and enjoy the taste so much more when I do have a pop.

I've also started exercising again and it is fun-ish. lol I haven't made it a solid habit again, but I have really tried to incorporate more strength training into every day.  Just little bits here and there, but it's something.  This is really going to be my focus for the next couple of weeks.  I have got to make myself (not really a morning person) get up at 6 and get moving!!

It's also time to really start taking notice of what I'm eating.  I'm reading a really good book,The Perfect 10 Diet, but it's taking FOREVER to get to the part of what I should and shouldn't be eating.  Yah, that's been my excuse for the past 3 weeks, but no more!  This book is making perfect sense and my doctor has been telling me I should be eating this way for several years now.  But I'm not a lover of "self-help" books and so I don't read them really fast and this one, while giving me a wealth of knowledge in the "why" category, I haven't gotten to the "how" part yet. :)  I know excuses, excuses.  If anyone is interested, the Kindle version is only $1.99 (if you have an ipad or iphone, download the kindle app, it's great!)


So anyway, I've only lost 2 lbs. so far.  However, my first week drinking that much water, it must have flushed (ha, ha pun intended) my system and my fingers got skinnier.  How lame is it that my fingers and my wrists are the first place I lose weight.  But I actually wore my wedding ring the other day (have only wore it sporadically for the last 6 years) and my watch is much looser on my wrist.  It's a start. 

Here we are to a new month and my resolve, with a slight change in focus, begins again.  I've gained some ground, and that's the most important part.  I found this great visual reminder on Pinterest.  I'm making this and putting it on the shelves next to my desk.  Next month, the "pounds to go" jar will be lower!

How are your goals/resolutions coming along?  Are you still sticking with them?  Do you need to reevaluate and maybe make some changes or tweeks to your goal? 

Sharing the accountability with:


Pin It

Friday, January 27, 2012

A Peek in My Family Room

I don't know about you, but I love looking at other people's homes.  I had so much fun the past couple of days peeking at other people's lives through their beautiful (and not so beautiful, actually, lol) homes. That's why we go to home shows, right?  I know not everyone I've seen walking through home after home are looking to buy. Okay, so maybe I'm a stalker, I'll admit I enjoy seeing how other people live.  Hopefully some of you are the same way.   Today I thought I'd give you a glimpse into my home and show you our family room.  Oh, and I'm keeping it real here, crooked pictures (I can't believe I didn't notice that before), messy desk, and everything. :)  And it's kind of hard to take pictures of this room.  While it's nice and bright with windows on 3 of 4 walls, every direction is shooting towards a window, so bare with me. 

As I mentioned here, we redecorated our family room about a year ago.  Here is the "before" picture:
This was a couple years ago at our Superbowl party with some friends, Bill's brother and aunt and uncle.
The redo was brought about because the couch had seen better days and Bill had FINALLY warmed up to the idea of color on the walls.  So the whole family went shopping for a new couch.  Imagine trying to make 8 people happy.  Well, I got out voted when they all fell in love with this couch.  While I liked it, I didn't love it.  I didn't really want a sectional again, thought the fabric was a little weird (it's kind of like terry cloth), and really wanted something more tailored.  But it had room for all 8 of us, Bill could definitely see himself falling asleep there, and it was a "non-snuggling" couch (Bill's term) - important now that Cheyenne can date.


I do like it more now. :)  It is very soft and great to relax in. As I said, Bill liked white walls.  When we built our house 10 years ago, he even wanted me to take a picture of the nice, white, bare walls before I hung anything up so he could always remember it.  He warmed up a little when he finally gave in and we painted our bedroom a beige color.  So to my utter surprise, he picked out this dark brown for the walls.  This was a very bold step.  When we finished painting, I was almost sick!  The walls looked purplish.  The next morning it wasn't much better.  I was ready to redo the whole thing, but Bill convinced me to wait a few more days.  I don't know if it was letting the paint cure more, getting used to the color, or having the couch delivered and more brown in the room, but it looked a whole lot better.  It's like the color of chocolate milk. Really!  Kind of makes me hungry sometimes.


This is the other side of the room, looking into the kitchen, complete with the vacuum still sitting out. Like I said, keeping it real.  At least that means Billy did his chores. :)


This is my favorite part of the room, my photo gallery.  I hadn't heard the term "photo gallery" when I did it and didn't know if I could really just have this across this great big wall.  I'm no decorator and have serious doubts when it comes to my decorating ability. lol  Plus, you can see a little bit in the before picture, I had a whole quilt hanging here plus all the kids' pictures - just a whole lot more stuff.  I wasn't so sure it looked "right" to be so plain, but I love it now.


Other end of the room.  Really dislike the desk, and the reason we have to have short curtains, but Bill's not too excited about a new desk.  This is sort of his desk so it has to meet all his requirements.  So still trying to convince him we need a new one.


I love this little desk/table, but it is also in need of a makeover.  I think I've decided what I'm going to do, now just waiting for the weather to warm up a little to get started.


And finally we've made it around the room.  That's the couch in the lower right corner, and the opening to the kitchen is just to the left.  You can also see the front door in the upper right corner, we have a very open floor plan, it's nice.  I love this spot, too.  I told the whole story about this spot here

So that's it, a little tour around our family room.  If you read this post here when I said my family would be laughing at how spot-on the description of "Classic Traditional" was for me, you can now see it, too.  Beige - replacing the navy and burgundy, a little boring, plenty of family pictures, yup, that's me.  So help me break out of my rut a little.  While I really enjoy my room, the end with the desk has never seemed right to me, too empty, but I don't know what else to do with it.  Do I have too many tables in here?  I would love to hear any suggestions or what you would do different in a room like this.  It's always nice to get a fresh perspective on things.

Pin It

Wednesday, January 25, 2012

What's Your Design Style?

As I was searching for family room pictures to include in yesterday's post here, I noticed that all the rooms I really liked were all starting to look the same.  Hmm, maybe I do have a style. lol Then I came across a great post from Compulsive in Texas in which she linked to a fun decorating quiz and talked about her decorating style.  So I took this quiz, from BHG.com, and as I sort of expected got the result of "Country".  This is what it said:
"You like to surround yourself with things that make you comfortable, so Country style is the way to go. This look connects with nature and days gone by while remaining fresh and original. An easy place to start your Country decor is with a blue-and-white color scheme and weather-worn wooden tables or benches. Accessorize with collections of anything you love. Antique furnishings—often creatively repurposed for today's lifestyle—are casual and rustic."
This is some what true, although I don't really like EVERYTHING rustic or antique, not a huge fan of blue-and-white color scheme, and I strongly dislike ruffles and flowery stuff - so not me!


So I decided to find some more quizzes to see if they all agreed.  I found this quiz at RealSimple.  My result here, "Cozy Casual":
"You’re about comfort and warmth, favoring warm, traditional rooms made for relaxing with family and friends. Your ideal decor draws on English and early-American furniture designs, as well as laid-back country, cottage, and farmhouse styles. Weathered, low-maintenance furnishings are easy, inviting, and built for daily life. Think golden retrievers, fuzzy slippers, and just about any movie by Nancy Meyers. To see more about Cozy Casual style, including a sample room, click here."
I like this description, it is pretty good.  Farmhouse style, yes, my house is a farmhouse style; golden retriever, I'd love one; fuzzy slippers, yes, I'm wearing mine right now. I had to look up who Nancy Meyers is and while I do like most of her movies, they're not my favorites.

storem mountain ranch house traditional living room

I love this room, except the flowery chairs.  I'd like them in red.  And that couch, the one in the center of the picture, love it.  In fact, I have a couch very similar to that.  This quiz also gave some features of each design style.  Cozy casual likes rolled arm couches with ball feet or skirts - that's totally what I'm always drawn to.

So now I was really having fun and found one more quiz to take, TheHomeStylist.  This was more of a personality test along with being home styles.  Very interesting to see how my personality totally nailed my design style, too. My results:
"Your style is Classic Traditional.

You like things matching and well placed. You prefer classic colors such as navy, burgundy, forest green, and beige. You buy furniture that stands the test of time. You don’t like trendy fads nor clutter. You keep a clean house. There are only a few knick-knacks but plenty of family photos. Traditions and family are important to you. When you entertain you invite close friends and family. You don’t like new things and are hesitant to try new colors or furniture placements. You grew up in a very traditionally decorated home and that is what you are most comfortable with. Your decorating challenge is for you home to not be too predictable or boring."

Umm, this is a little embarrassing, but that description is spot on!  I'm sure my family is all laughing now.  Up until a year ago, my family room was navy and burgundy, my living room is burgundy and forest green, my bedroom was navy and burgundy.  Now I've really updated and my family room is brown and barn red (see here), and my bedroom is beige. lol  Yes, my house is predictable and boring which was exactly why I was looking at all these sites. :)


This is my bedroom (see a little more here) , although now there is a window above the bed, so that wall is not quite so plain.  But yeah, beige, classic traditional, cozy casual, a little bit country, and a little boring.  I guess it's me. lol

So what do you do when you want to spruce things up a little.  I start dreaming.  Pinterest is great, I have my "For the Home" board there where I collect all my inspirations usually from other places on the web.  However, It's amazing what others have posted as well.  Search for whatever you're looking to update, kitchen, bathroom, etc. and you'll find all kinds of things.  All three of the above posted sites had great home style tips and articles, also, but my favorite new place to visit is Houzz.com.  Wow, talk about an amazing collection of home ideas!!  They have everything from exteriors to interiors, pools to porches, even closets to wine cellars. lol  You can even save everything you like to your own "idea book."  It's fun!

So what's your design style?  Does your house reflect who you are, your personality?  If you take any of these quizzes, I'd love to hear what your design style is and if you agree with it.


P.S. My sister and frequent guest poster, Leslie, took the quiz and shared her fabulous style here.

This post was featured by:


Pin It

Monday, January 23, 2012

Get Cozy in Your Home by Christina Johnson

I'm excited to welcome our guest-blogger today, Christina Johnson.  I was thrilled when she contacted me and asked if she could do a guest post here.  Sure!! So let's get to know her a little.


"Christina Johnson works remotely for Elliman Prudential in the NYC Apartments and Rentals market. She is using her journalism major to combine what she loves most, writing and her career. Her specialties include home decor design and DIY home improvement projects."

She sent me this wonderful article on family rooms.  I love my family room! Next to the kitchen it's probably the room my family spends the most time in.  Read on to learn some great tips on making the most of your family room.

===============================
Get Cozy in your Home


A lot of homeowners tend to overlook the design opportunities available for the family room. Because it isn't a formal room, it often becomes a catch-all collection of odd furniture, toys, crafts and other accessories. However, there are several very affordable and unique interior design techniques that can be used that will make it even more inviting for the whole family.
Bella Fiore traditional family room


What Will You Use It For?

When you make plans to enhance or improve the decor of a room, it is important to first consider the focus or goal of that room. You will want to determine what you will be using the room for and think about the mood you want to set. In most cases, the family room is the most relaxed and comfortable room in the home. Because of this, it is where many families spend most of their time together.

Some families work to create a whole home theater experience, while others focus more on games. Some families like to do activities or crafts together, while others might want to establish a quiet place to gather, read or just spend some quiet time together. You don't have to spend a lot of money to create the family room you've always wanted.
Crisp Architects traditional family room

Start With Color

One of the easiest ways to make big change on a little budget is to start with a splash of color. A bucket or two of paint and supplies will cost less than $50, but can make a big difference to any room. Think about the colors that will best express the focus of your family room, such as neutral or pastel colors for a relaxing environment or bold colors for an exciting activity-focused room. 

Consider using two different colors to add focus or fun to one or more walls. You can paint or use color stain on wood paneling or add a splash of color to furniture, shelving and cabinets. Don't be afraid to think "outside the box" and try something new.

POPLAR RUN - OXFORD modern family room

Establish A Theme

If movies are your thing, consider adding a nostalgic popcorn popper, add some light-blocking curtains and arrange your furniture to create optimal viewing opportunities. Many decorating stores now carry old-fashioned looking marquee signs, metal art that features movie reels and film or movie posters of your favorite films.

If your family activity-oriented, consider adding a table and chairs for board games or crafts, a gaming area for video games and some nice shelves to keep it all neat and organized. There are a lot of great store-bought options available, but you can also find new uses for old items that will keep things organized at a fraction of the cost.
Photo from Red Hen Home
Photo from House of Turquoise/Hiya Papaya

Accessories: Bringing It All Together

A nice area rug, throw pillows, afghan or new lamp shade in coordinating colors can help bring it all together. Whether your tastes are contemporary or tend to be a bit more conservative, make sure to choose new items to add that will enhance the message or emotion you are trying to express. Curtains, shades, blinds and other unique window treatments can also help to tie your room's decor together.

Purchase artwork that matches your theme or buy a blank canvas, grab some paints and encourage your kids to create a unique piece of artwork to hang on your walls. Use family photos to create a whole wall display. You can use black-and-white photos or color, add matting and choose from brightly painted, simple black or traditional metal frames.
Photo from House of Turquoise
Photo from The House of Smiths

A Fresh Look On Any Budget

It doesn't matter how much money you have to spend or how much you know about interior design, it is easy to create a cozy family room in no time. A good plan, a little research and some old-fashioned elbow grease will help you design a useful, comfortable room that the whole family will love.

Ullswater traditional family room

===============================

Thank you, Christina!!  Great article and I had so much fun drooling over, um, admiring tons of beautiful, fun family rooms to find these pictures.  Because Christina doesn't have her own blog, you can leave her lots of good comments here.  Come back on Wednesday for some more designing fun -What's your design style?

Friday, January 20, 2012

Lotion and Lip Balm - Beat the Winter Weather

It's the middle of January, the bitter coldest winter month; snowflakes flying; kids praying for wind so we can get out of school; the temperature dropping to negative digits - again the kids praying it gets to the magic number for school closure.  Well, that's usually what January is around here.  Today is a balmy 35 degrees already at 8 a.m., rain if we're lucky, and not a trace of snow. :(  However, my hands and lips are still feeling the effects of winter's wrath, always dry, chapped, and cracking.  I have a solution, and this year, my hands are much better than in the past.  I found two great recipes for making your own lotion and chapstick and they are great!

I found this recipe from Katie at This Chick Cooks.  She also has a great cost break down if you're interested in the nitty gritty of it.

Homemade Bee Balm Recipeyields 16 ounces of balm 1 1/4 cups grated bee wax (about 2 ounces)
2 cups light olive oil or coconut oil
15-20 drops of essential oil (optional)
Containers for your balm

Set out your containers that you will be putting the balm into so that they are ready. Next, find a large pot and a smaller pot that will sit in your larger pot (or a double boiler). Add enough water to the larger pot so that it comes up around the bottom of the smaller pot. Bring the water to a boil.
In the top pan, add the olive oil and cook for 15 minutes. Next, add your grated bee wax. Stir the mixture until everything is melted. Add essential oil. Dip a spoon into the mixture and set it aside for a few minutes to see if the balm is your desired consistency. If you want thinner balm add more olive oil, and if you want a thicker balm add more bee wax.

While the mixture is still liquid pour it into your containers. Let it sit uncovered for several hours until totally cooled and it will harden and be ready to use. 

I used coconut oil and a some mango essential oil and it smells delicious.  However, the coconut oil really overpowers the other smells and the essential oil isn't noticed much.  Also, when you grate the beeswax it smells like honey, who knew?! Probably all you smart people out there. :) I've never used beeswax for anything so this was a nice little surprise. lol  Anyway, this is SUPER easy.  I'm not sure why you need to heat the oil for 15 min. because it took maybe 1 minute for it to all melt so I might try shortening that time next time I do it.

Lisa at Lisa Take Six shared this super cheap, you can get everything at the Dollar Store, but wonderful recipe for really moisturizing lotion at her blog a few weeks ago.

Super Moisturizing Lotion

Baby lotion
Vitamin E Cream (found out from looking at other recipes, this was probably supposed to be Vitamin E face cream)
Pictured here is a cocoa butter WITH vitamin E.  Pretty much any lotion will do, the vitamin E cream would just be more nourishing for your skin
Vaseline (small jar)
Containers - these small travel bottles are perfect for a purse, a desk drawer, or to give as gifts

Just dump everything in your mixer or you can use a bowl and hand mixer, and start whipping.  Tip - if you cut down the middle of the bottle, you can use a spatula to scrap out every bit of the lotion.  However, you might want to keep your biggest bottle to reuse and put the lotion back in when you're done.
Looks yummy, doesn't it?  Let it combine until it's all nice and fluffy.

That's it!  Now put it in your containers.  I tried using a funnel to fill the jars, it worked okay, but I spent a long time trying to "push" the lotion down, it doesn't pour.  However, I found an awesome tip from another lotion blog and I apologize to whomever I found it from, I forgot to write your name down, but she scooped the lotion into a ziplock bag and cut a corner off the bag to easily squeeze it into jars.  Trust me, do it this way, it's got to be sooooo much faster! This is a nice thick lotion. It's a little greasy at first (because of the vaseline) but it really soaks in quickly, and I'm a little picky about how greasy my lotion is. I don't like to be slimy. lol  This would be great to rub into feet and wear a pair of socks to bed or into hands with some cotton gloves to really let it soak in all night.

I made these for my friends for Christmas, and to decorate the jars, I used Avery 2x4" labels.  You can go to Avery's website and design them however you want, even bringing in any digital scrapbook papers, or even pictures if you want.  For the lip balm jars, I used the same labels, but used a 1" circle punch to cut them out.  I'm sorry, I don't have pictures, I guess I never took any before I gave them away and the ones I kept are just plain.  Plus, at the time, I only had a black/white printer (got a new color printer now, yeah!) and the labels weren't super cute. :)

Hope this helps with you beat your winter dry skin!  Now pray for snow or spring, I can't decide which I want more now. :)

This post was featured by:
 Featured on Pinkapotamus 
Pin It

Tuesday, January 17, 2012

DIY Stain Pretreater & Other Laundry Tips

Funny story, a couple years ago our women's group at church was having a Saturday meeting and I was asked to teach a class on making your own cleaning products.  I'm not sure why I was asked as I had never done any of this before.  My mother-in-law was in charge of the meeting and I'm not sure if she thought I made my own stuff or what. lol  I had always wanted to make my own cleaners; I'd bookmarked (back in the days before Pinterest) several sites and recipes I wanted to try but had never gotten around to it.  So I did a bunch of research, tested out a few things, and ended up with a several page handout of awesome cleaning recipes. :)

Anyway, today I'll share my laundry tips and recipes.  Here is one of my very favorites:


Stain Pretreater
  • ½ c. vinegar
  • ½ c. ammonia
  • ½ c. Wisk
  • ½ c. water
Mix all ingredients and store in a spray bottle. Spray on anything with grease or food spots and wash as usual.  This is super cheap and will get out about anything.  It'll get out most food grease spots even after being washed and dried - you know, when the kids don't tell you or the kids themselves are doing wash and just shove everything in.  It's also really good at removing ring-around-the-collar.

I also found this recipe for laundry soap - it's all over the internet.  However, I've never tried it myself.  I already ruined a washing machine because I used too much soap and I'm not sure how "soapy" this is.  Plus, when we bought our same washing machine 4 years later, the sales lady told us to only use 1 tbsp. of soap at the most per load.  This has worked great for us, getting all our clothes clean.  I bought a HUGE box (I can't remember how many pounds) of laundry soap when our triplets were born and almost 7 years later I still haven't finished it yet, getting very close though. 

Liquid Laundry Soap- Front or top load machine- best value
- Grate bar of soap and add to saucepan with water. Stir continually over medium-low heat until soap dissolves and is melted.
-Fill a 5 gallon bucket half full of hot tap water. Add melted soap, washing soda and Borax. Stir well until all powder is dissolved. Fill bucket to top with more hot water. Stir, cover and let sit overnight to thicken.
-Stir and fill a used, clean, laundry soap dispenser half full with soap and then fill rest of way with water. Shake before each use. (will gel)
-Optional: You can add 10-15 drops of essential oil per 2 gallons. Add once soap has cooled. Ideas: lavender, rosemary, tea tree oil.

Yield: Liquid soap recipe makes 10 gallons.
-For Top Load Machine - use 5/8 Cup per load (Approx. 180 loads)
-For Front Load Machines – use ¼ Cup per load (Approx. 640 loads)
* Baking Soda will not work, nor will Arm & Hammer Detergent

TIPS FOR LAUNDRY SOAP: We use Fels-Naptha  bar soap in the homemade soap recipes, but you can use Ivory, Sunlight, Kirk's Hardwater Castile or Zote bars. Don't use heavily perfumed soaps. We buy Fels-Naptha by the case from our local grocer or online. Washing Soda and Borax can often be found on the laundry or cleaning aisle. Recipe cost approx. $2 per batch.


Fabric Softener for Dryer
  • 1 Sponge cut in quarters
  • 1 Cup Downy or other liquid fabric softener
  • 4 Cups Water
Cut sponge into 4 sections. Mix Downy and water. Store sponge in mixture; drain one sponge for each load of laundry. Put sponge in dryer with clothes. When load is done put sponge back into the mixture to use again.


If you don't like using fabric softener because it leaves a coating on your clothes i.e. your skin; because of allergies/sensitivities; or because like all of my husband's wrinkle-free dress pants say not to use fabric softener; I use vinegar.  I add 1/2 to 1 c. to the rinse cycle, just pour it in the fabric softener dispenser.  You can smell the vinegar when the clothes are wet, but when they're dry they have no smell.  Believe me, my husband with his "super-smeller" can't even smell the vinegar after the clothes are dry. I use dryer balls, like these, to cut down on the static electricity in the dryer.
 Here are a few more uses for vinegar in the laundry room:
  • Before washing a mustard, ketchup, spaghetti, or barbecue stain, dab with white distilled vinegar.
  • Remove perspiration odor and stains on clothing, as well as those left by deodorants, by spraying full-strength white distilled vinegar on underarm and collar areas before tossing them into the washing machine.
  • Get cleaner laundry! Add about 1/4 cup white distilled vinegar to the last rinse. The acid in white distilled vinegar is too mild to harm fabrics, yet strong enough to dissolve the alkalies in soaps and detergents. Besides removing soap, white distilled vinegar prevents yellowing, acts as a fabric softener and static cling reducer, and attacks mold and mildew.  It helps keep colors from running, and helps keep hair (pet or human) and lint from clinging to clothes.
  • Keep the steam iron clean and in good working order by getting rid of mineral deposits in steam vents and spray nozzles. Fill the water chamber with a solution of equal parts white distilled vinegar and distilled water. Set it in an upright position and let it steam for about 5 minutes. When the iron is cool, rinse the tank with water, refill and shake water through the vents onto an old cloth. Test before using.
Do you have any more great tips for laundry?  Please share them in the comments.  We can all benefit from being thrifty and a little more "green" health wise in the laundry room.


This post was featured by:
{Junk in their Trunk} 

Thursday, January 12, 2012

iPad Apps

It's been one of those days.  It's now 3:30 and I'm finally eating lunch and getting around to getting a post up today.  I had my nice little day all planned and NOTHING went according to plan. :)  We have a several dvd machines (like red box) around the area, and I always load the new movies in the two in town.  This usually takes maybe 5 min. at each store.  Today it took almost an hour between the two!  I should have just bought the heart wreath form I found yesterday, although it was smaller than I wanted. Instead, I spent a great deal of time trying to configure in my mind how to make my own while staring at styrofoam and wandering around my local craft store when they didn't have any heart wreaths at all.  I spent an insane amount of time standing in a return line at Walmart, just to return a hanger (okay, it was a $5 hanger and I really had no use for it. I'm not sure it was worth it.)  I bought a box.  Exciting, I know.  I always feel pretty lame when I have to pay money for a box, but just I didn't have one the right size.  I did get 32 certificates ready and delivered to my youngest childrens' school as part of the student achievement awards I'm in charge of.  Even those didn't go as quickly as I wanted either.  I've had 1 glass of water today, I think, and I broke down and bought a pop while I was in town starving and trying to ward off a headache.  :(  At least I got to come home to these cuties:


Pictures from 2010
They make me smile.  They're pretty goofy.  I sure love them all!

Anyhoo, the real reason for the post today, my sister, Leslie, and I both got iPads for Christmas.  So we want to know your favorite apps.  Leslie wondered if anyone had any recommendations for good educational (kids) apps.  I just want to know anything fun, helpful, whatever, that you use.  I'm pretty much a novice to all apps.  I don't even have a smart phone! Gasp!! I know, heck, I barely started texting a few months ago.  So any recommendations would be awesome.  What apps can you not live without?  Which ones do you use daily?  Which ones do your kids play/use when they steal your iPad?  Leave a comment and let us know your favorites.

Monday, January 9, 2012

Where the Wild Things Are Birthday Party

Do you have any "wild things" in your home?  My sister, Leslie, is back today with another great birthday party idea.


We did this party when my youngest turned 2.  He has always been a bit of a "wild thing" so this was a fitting theme, plus our family loves this book.


The decorations were really fun to make.


The cupcake idea came from here.


To make these personalized illustrations, I found images from the book online and printed them (you could also scan pages from the book).  Then, I copy and pasted pictures of the birthday boy into Microsoft Word.  I sized them down to fit the illustrations, and then printed and cut out his picture.  Then, I glued them on to the illustration print outs.


I still laugh when I see these.  We still have some hanging in his room.  


For the party guests, I made these fancy crowns (with help from the B.K. employee who said we could have six : ), using the same method listed above.  The kids loved to see their pictures in place of "Max."  They also received their own copy of the book.


The wild guests, looking quite docile at the moment.

After my husband read the book to the kids, we gave them sixty seconds to "Let the wild rumpus start." They yelled, screamed, and ran around like crazy...actually, now that I think of it, it seems like it was only my boys running around like crazy, and their cousins staring at them in panic. Thank goodness it was only sixty seconds!

  A few days after the party, when the fun of tearing through the house in their "Max" crowns wore off, I cut out the pictures from the crowns and glued them inside our copy of Where the Wild Things Are, so I can always remember my three wild things at this age. 

(OK, let's be honest, there are plenty of days when I'd like to forget their daily wild antics, but again, they love to see the pictures and relive their day as "Max")


Thanks Leslie!  Isn't that such a cute idea?!  I love her kids' pictures in the illustrations.

Related Posts Plugin for WordPress, Blogger...