Saturday, December 10, 2011

Party Week - Giveaway #4


This giveaway is now closed.

Well, better late than never today. :)  Here's giveaway #4:

This is a little girl size knitted hat.  It's a charcoal gray color.  Yup, my mom made this one, too.  She's just awesome! It's just like the one my daughter, Cheyenne, has on in this picture. Isn't she so cute! :)


So if you want it here's what you have to do:

1. Be a follower!  Sometimes it's good to follow. :)  Leave me a comment and let me know you are following. If you are already a follower, leave me a comment and tell me.

Extra entries:
2.  Like The Brown Eyes Have It on Facebook.
Spread the word about my giveaway week:  
3.  Post about it on your blog, link to your blog in a comment.
4.  Tweet it
5.  Post it on Facebook using @The Brown Eyes Have It so I'll see it, too.
Please leave a separate comment for each entry letting me know what you've done.

Five chances to win! Giveaway will end Saturday, Dec.17 and winners will be announced Monday, Dec 19.
Thanks everyone, I really appreciate each and every one of my readers!  Come back on Monday for another great freebie.


Other giveaways this week:

Friday, December 9, 2011

Party Week - Giveaway #3

This giveaway is now closed.

Good morning everyone! My husband surprised me today by taking the day off so my schedules a little off.  We've just been relaxing this morning, and then I think we might finish up a couple gifts left to get or go to a movie or something. :)

So today's giveaway is the red bead necklace I made here.  They were so fun to make that I made one for you, too.
So if you want it here's what you have to do:

1. Be a follower!  Sometimes it's good to follow. :)  Leave me a comment and let me know you are following. If you are already a follower, leave me a comment and tell me.

Extra entries:
2.  Like The Brown Eyes Have It on Facebook.
Spread the word about my giveaway week:  
3.  Post about it on your blog, link to your blog in a comment.
4.  Tweet it
5.  Post it on Facebook using @The Brown Eyes Have It so I'll see it, too.
Please leave a separate comment for each entry letting me know what you've done.

Five chances to win! Giveaway will end Saturday, Dec.17 and winners will be announced Monday, Dec 19.
Thanks everyone, I really appreciate each and every one of my readers!  Come back tomorrow for another great freebie.

Other giveaways this week:


Thursday, December 8, 2011

Christmas Planner

Yesterday I was thrilled to be a guest poster at Type A Decorating.  This is what I shared with Tammy's readers over there, and now I'll share it with you here. :)

Today’s post is a simple, cute way to organize your Christmas.  This is small enough to stick in your purse, or easily hide, but contains everything you need to know to get you through the holidays with more time for having fun with your family.  Bonus, you can use it for several years, too.


Supplies needed:
Small 7x5” notebook
Scrapbook paper
Ribbon
A file tab punch is great, however, I also had tab stickers, or you could just cut your own
Other stickers, flowers, and embellishments
Adhesive – make sure whatever kind you use it’s a permanent adhesive


I started out with all the stuff on the left and then as I looked further into my stash of papers, I found all these on the right that I bought recently (okay, a year ago) and loved them even more.  Just a couple ideas to show you how completely unique these can be (great gift ideas, too!)
Start by cutting your two papers, the top one is 4 ¾” x 4” and the bottom one is 4 3/4” x 3”.  Basically, I went with two-thirds on top, one-third on bottom if you use a different size notebook.  Cut a piece of ribbon approximately 5 1/2” or a little longer, to cover the edge where the papers join.  I actually had adhesive-backed ribbon, which was nice.  Probably the easiest way to join them all together is to lay your ribbon down with the adhesive up, and center your two papers on top of the ribbon.  Then wrap the ends carefully around the edges, be careful not to bend or curl your paper, and glue the ends down on the backside of the paper.

Next, glue the whole paper/ribbon combination onto the notebook.  Make sure you put adhesive on both the notebook and the paper – just seems to hold stronger.  I used a tape runner, but ended up using Scotch brand Quick-Dry liquid glue to touch up spots that were coming loose.  Add a title to your planner and whatever other embellishments you want on the front. 
Now is the time to do some thinking and decide what exactly you want in your planner.  My notebook has a pocket inside, so that’s a great place to keep Receipts.  I also did Gift Ideas so as I find ideas throughout the year either on-line or in catalogs, I can jot it down here and remember where I saw that perfect gift.  Also I’ll use it as a place jot down things people just mention in conversation.  You know when that light bulb goes off in your head as your husband (who’s my hardest to shop for) mentions some strange tool “it would be really nice to have,” but then I can’t remember when I’m standing in the tool store.  You could also keep a list of clothing sizes here or things they need for those you’re shopping for –  Chloe wears a size 11 shoe, but Maddie is an 11 ½, Billy needs pajamas.  Traditions could be another category, traditions to try and traditions to continue.  If you’re like me, December can get a little crazy with all the things we have to do and all the things we want to do.  This will give me a spot to list those things I really want to make time for and also a place to write down cool traditions that I hear from others that I want to try with my family.  Cards.  I keep all the addresses of those I send cards to on my computer so I can print labels, but I think it will be nice to have a place to just list the names I’m sending to.  I can also add to the list here in preparation for next year as we make new friends or get cards from different people. (Or to cross out those who don’t make the list! ;) lol)  Menu is where I’ll list my Christmas dinner menu, obviously, but I’m also going to make a list of treats to make, or treats to take to neighbors, or even jot down new recipes to try.  The Gift List section will be where I actually list out the gifts I’m giving, that’s why this planner will be hidden from all little eyes!  I’m one of those people who buy gifts all year long.  The all get hidden away, and sometimes I forget what I’ve bought, who it’s for, or how much I’ve already bought.  It’s also handy when you can’t remember what you gave people last year (or the year before.)  Plus, it’s kind of fun to look back and see what your kids got when they were younger (or in my house, prove you were right when you said you got “such and such” in “whatever year”.  Yah, we get a little competitive about the dumbest things. J)  My final section is Notes.  I can use it just for notes, or as a little journaling place to write down some thoughts and highlights of each Christmas season.  There are many other things you could list: decorations - take a picture of that perfect mantle so you’ll remember how to set it up next year; glue in a December calendar to make notes of all those parties, kids programs, concerts, etc. that you want to attend; a budget section; a party planning section – a place to list all you need to do to host that perfect party; whatever else would be helpful to you.

After you’ve decided what to include, you need to make tabs and a title page for each section.  I used a file tab punch to punch out my tabs out of the same paper I used on the front.  My papers were both double-sided so I used the back side for tabs, too.   You could also buy tab stickers, or just cut out a tab shape – they’re about 3” long.  For the title pages, I had a sheet of embellishments/tags, I’m not sure what they’re called – it’s the top paper in the right-hand picture.  I cut these apart and wrote the name of each section on them.  Some of the tags were too big to use, so I just cut a square of decorative paper or used another large punch to decoratively cut a title plate for some sections.
Glue the tab to the edge of a single page.  I only stress that because the first time I made one of these I accidentally glued it to the first page and then the last page I had sectioned off.  Doesn’t work very well that way. J  Then glue on your title tag.  I made my sections about 10 pages each, although some were a little bigger when I’d be writing a lot more.  It’s up to you, how many sections you have, and how many years you want to use it, etc.  As you are gluing your tabs on, remember to stagger them so it’s easier to read the tabs.

The final step is to add the ribbons to the spiral binding.  I like the mix of some plain ribbon and some patterned ribbons.  Cut them about 4” each, but I found out that the wider and stiffer the ribbon the longer the length you need to be able to tie them.  For example, the green ribbon I used was 1/8”, and a 4” long piece was more than enough to be able to tie it on.  However, 4” of the patterned ribbon, which was more like 1/4” and a grosgrain ribbon, was barely enough for me to tie on.  Just slip the ribbon through the binding and tie a double knot on each spiral.  A little tedious, but makes it really cute, I think.

That’s it!  It really doesn’t take that long to make and it will be invaluable to you as you try to have an organized, stress-free Christmas. 

Here are some variations of this planner that make great gifts!

This was featured by:
 Tuesday To Do FEatured


Party Week - Giveaway #2

This giveaway is now closed.


Giveaway #2 sneak peek: (because facebook is dumb, or I am lol, and it only posts my first picture)

But first, exciting news today - I'm doing my first guest posting today over at Type A Decorating.  Go check out my Christmas Planner post (or come back tomorrow and I'll share it here.)


Now on to today's giveaway.  My mom has generously given me one of her super cute headbands that she was working on here.
You know, it's kind of hard to photograph these headbands without modeling them. I tried about 5 different "poses" to get something that looked sort of normal. :)

So if you want to win this cute, mustard yellow knitted headband, here's what you need to do to enter:

1. Be a follower!  Sometimes it's good to follow. :)  Leave me a comment and let me know you are following. If you are already a follower, leave me a comment and tell me.
Extra entries:
2.  Like The Brown Eyes Have It on Facebook.
Spread the word about my giveaway week:  
3.  Post about it on your blog, link to your blog in a comment.
4.  Tweet it
5.  Post it on Facebook using @The Brown Eyes Have It so I'll see it, too.

Please leave a separate comment for each entry letting me know what you've done.
Five chances to win! Giveaway will end Saturday, Dec.17 and winners will be announced Monday, Dec 19.
Thanks everyone, I really appreciate each and every one of my readers!  Come back tomorrow for another great freebie.

Other giveaways this week:
Giveaway #3
Giveaway #4
Giveaway #5
Giveaway #6
Giveaway #7

Wednesday, December 7, 2011

PARTY Time! Giveaway #1

This giveaway is now closed.


I DID IT!! I MADE MY GOAL OF 100 FOLLOWERS!  Yeah, I'm so excited (can you tell!)  A few months ago, I was at a crossroad - do I quit blogging (just my family/personal blog), because I haven't been keeping it up, or do I focus more on the crafts and everyday stuff I do and make it a public blog.  I decided to give it a try.  I had no idea how much work it is.  I mean I thought, "I'm doing this stuff every day so how hard could it be."  But the reality of posts two or three times a week, linking to parties every day and all that goes with that, trying to figure out this whole other language as I try to tweak my blog, it's work.  However, I'm loving it!!  So to watch that follower number increase was awesome.  I can't tell you how excited I was to have my first follower that wasn't my mom or sisters (not that my mom and sisters aren't awesome, of course they were the first to sign up.)  So THANK YOU to all of you that actually read this blog, I really am honored because I know I have some serious competition for your attention and mostly your time. 

Let's celebrate!  I have a week full of giveaways planned, a new giveaway every day.  So spread the news, come back and check it out and win some Christmas presents for YOU.

Today's giveaway:
A leather band wrap watch.  Sorry, I just couldn't get a really good picture of this, but it's a brown leather band with a brushed nickel face.  It also has an adjustable chain to make it various lengths.


So how to enter:
1. Be a follower!  Sometimes it's good to follow. :)  Leave me a comment and let me know you are. If you are already a follower, leave me a comment and tell me.

Extra entries:
2.  Like The Brown Eyes Have It on Facebook.
Spread the word about my giveaway week:  
3.  Post about it on your blog
4.  Tweet it
5.  Post it on Facebook
Leave a comment for each entry letting me know what you've done.

Five chances to win! Giveaway will end Saturday, Dec.17 and winners will be annouced Monday, Dec 19.

Thanks everyone, I really appreciate each and every one of my readers!  Come back tomorrow for another great freebie.

Come see my other giveaways this week:

Tuesday, December 6, 2011

Wedding Gifts - Wood Name Signs

Last week I shared with you this cute baby gift I made for my cousin.  I must be on a name kick right now because as I was contemplating what to give/make for a couple of weddings we were celebrating this weekend, everything I kept thinking of involved their new names.  Then I got this email from GroopDealz (love them!) and knew I wanted to make this:

GroopDealz:

I remembered I had a couple other wood signs that "spoke" to me at the thrift store.  Here's my beauties in all their glory.


Check out the skill in that wood burning!  That gave me a little trouble.  The other board had a super, high-gloss finish on it plus a few holes.  So they took a little work, but it was worth it. I filled holes, filled the whole "let freedom ring" and bells, sanded, and sanded some more.  Then I painted them both black.  The first board looked great, the freedom board, not so good.  I could still see all the bells and words through the paint.  So some mod podge and paper to the rescue.  That covered it all up.  Did a little more sanding and added vinyl letters and their names.  I LOVE how the first board turned out!  The second one I was in a hurry, even using the blow dryer to get the mod podge to dry before I wrapped it.  It didn't turn out so well, the paper didn't match as well as I'd liked and I didn't get the name on it over the line between the papers.  Grrr!  Oh, well, I hope it isn't too noticeable.
  Anyway, here's the finished products:


Great news! I made it to 100 followers so that means it's time for a P.A.R.T.Y!! I'll be having giveaways every day for the next week.  Come check them out!


This project was featured by:

 IhookedupwithHoHlamespice Ninth Street Notions


Friday, December 2, 2011

Thrifty Jewelry Christmas Gifts - Part 2

From my post the other day here, you know part of our Thanksgiving weekend was spent gettin' crafty.  My sisters, sisters-in-law, Mom, daughters and niece have an annual tradition of a big craft day.  We spread out all over my mom's big table and talked, laughed, ate chocolate cinnamon bears and the occasional piece of pie, and just had a great time together.  These are some of what we made:


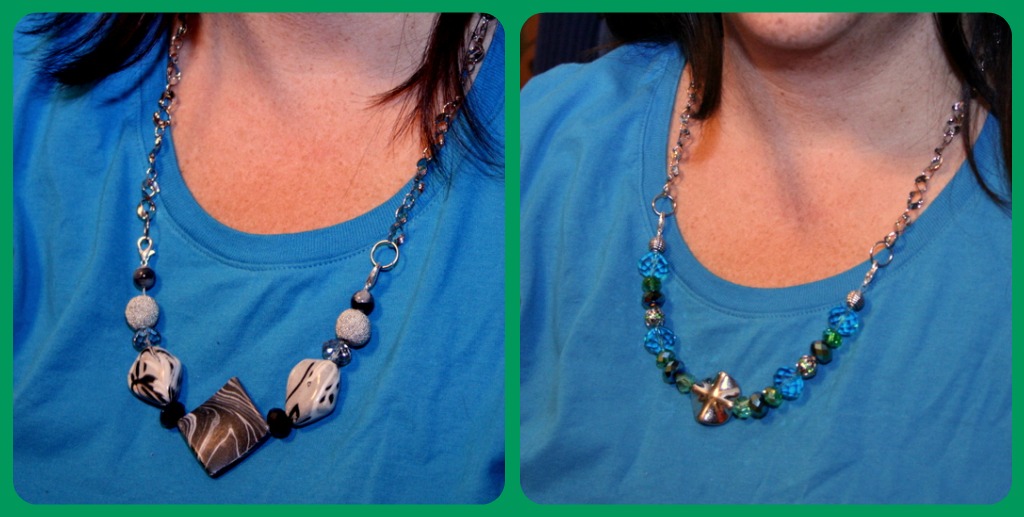
Today I'm going to show you what else we did.  My sister Kristen (with help from SIL Alana) made this really fun interchangeable necklace.

 You can change the bottom row of beads to match your outfit, and it's adjustable from 18" long to around 30" long.  Cool!  The initial cost was a little more expensive, I think it was about $10 for just the chain, but then each bead strand cost only around $5-$10 depending on the beads used.  Still not bad considering each necklace is totally unique to you.

Supplies:
12” of nicer chain
12” of extender chain
4 jump rings
3 lobster clasps
beads
wire
crimp beads

Let me start by explaining the difference between "nicer chain" and "extender chain".  The "nicer chain" is the chain that you'll see mostly.  Kristen bought some cuter, bigger, twisted looped chain that was more expensive.  The "extender chain" was the cheapest stuff they had, just plain regular chain, but it's mostly in the back, so you don't really see it.


Split the nicer chain into two 6" pieces.  Then attach the extender chain with a jump ring at each end.  Now Alana and Kristen were debating over which way to do this next part.  Either you can split the extender chain also and attach a lobster clasp at one end, this is the professional, store-bought looking way.  OR leave the extender chain in one piece, just attaching the lobster clasp on it so when you shorten the chain, you'll have a loop of chain in back instead of a dangling piece.  Either way is fine, it's all in back anyway so it doesn't really matter.  Both ways look good, not cutting the chain is just easier.  Then add a jump ring at either end of the nice chain.  Now your basic chain is done, you're ready to attach the bead string.

This is the fun part.  Make about a 6" long string of beads.  Cut a piece of stringing wire about 8" long, and string on whatever beads you like.  At the ends, string on your crimp bead and lobster clasp, then loop the wire back down and through the crimp bead.  Crimp it.  Do this for as many different bead strands as you like.  This makes a very fun, unique gift.

Now on to the second necklace.  Mine was much easier. :)  I made this necklace which was inspired by this post:

Supplies:
Christmas bead garland - $5 at Michaels and I made 4 necklaces with few beads leftover
Jersey knit material

First of all, I cut a piece of material 2 yards long, but only about 3/4" wide.  You could probably piece it together, I just happen to have a scrap piece that long.  After it's cut, grab one end and start stretching it.  It'll curl in onto itself and make a sort of rope/chord.  My 2 yards of fabric now stretched to 3 yards.  Cut off on end at about 22" for your second string.  This is made in two parts.
Left side - stretched, Right side - not stretched
Then start stringing.  Wrapping the ends with a little tape makes it so much easier.

Slide a bead on down to the middle of your long string, and tie a knot on either side.  Then string another bead, and tie a knot.  I strung 13 beads on the bottom strand and 11 on the second strand.  End each strand with a knot.  Then you'll attach them together with a little hot glue.  Since the material curls in on itself, I uncurled the bottom string, put just a dab of hot glue in it and put the short strand inside it, letting it curl back around it.

Cut off the extra from the inside/short strand, and slide on another bead over the top of the glued part.  Then tie another knot and you're done.  Word of caution, after you're done, it might look a little crooked in places and not lay just right, just wiggle it around and play with it a minute and you'll getting looking right.  DON'T stretch it more, though, not that we had any experience with that (but it wasn't me).  However, if you do happen to stretch it out, we found out that you can undo the whole thing, untieing each knot and do it over again. :)  This is really quick, maybe 30 min, really cheap, and another great gift idea.


Hope you enjoyed our crafting session as much as we did.  My family is the best! We all get along really well and have a lot of fun together.  Love you all!


Help me reach and exceed my goal of 100 followers! I'm so close!

Related Posts Plugin for WordPress, Blogger...